The lifelong dream of imaging Orion
October 25th, 2024
Motivation
Probably as long as I can remember, and particularly since I began my journey observing the sky, the first constellation that definitely caught my attention was the mythical figure of the giant Orion who, followed by his two faithful dogs, fights defiantly against the Bull and everything that comes into his sight. The figure of the hunter is delicately outlined by the bright stars that form the constellation that, unlike the vast majority of figures in the sky, really resembles what its name says.
I remember drawing Orion while observing it with the naked eye from the terrace of the building where I lived in the city of Santiago de Chile. Everything happened when I was 15 years old and, the more times I drew it, the more details appeared and I even included the main deep sky objects, which I detected using a set of binoculars. To this day I still have those drawings and every time I see them, a series of emotions and beautiful memories come to my mind of those warm summer nights in the southern hemisphere under the stars of Orion. It strikes me to think that I came to form such a special and close relationship with Orion that when that time of year inevitably came when the Sun entered its domain and hid it under its powerful brightness, I counted the weeks I had to wait to see it rise again at dawn.
Want to learn to identify a constellation? Simply make a drawing of it while observing and later, glue some stickers for extra information. Technically, it’s an early form of astrophotography from the very basis. I made this in 1986, the year of the Halley comet!
Beautiful memories that gave rise to my lifelong passion for systematic observation of the sky, either with the naked eye or with simple instruments. In fact, Orion fueled the motivation that led me to begin dreaming of the idea of one day being able to photograph it instead of simply drawing its shape in the sky. And that desire to photograph Orion finally materialized when I became a member of the Chilean Association of Astronomy and Astronautics (ACHAYA) in 1986, the year of the mythical Halley's Comet. At this institution, I had access for the first time in my life to an astronomical observatory with instruments that allowed me, among other things, to learn analog photographic techniques both in data acquisition and its subsequent development process. Since that time, I was able to capture the light of Orion using 35mm film initially and then using the NASA Astrograph which used Kodak photographic plates. A lot of history and observations have passed since that distant 1986 and my fascination with Orion became a true support for my passion for astronomy which remains current to this day. And in one way or another, I always had in mind to make an image of Orion again but using current technologies both in the acquisition and in the processing of data.
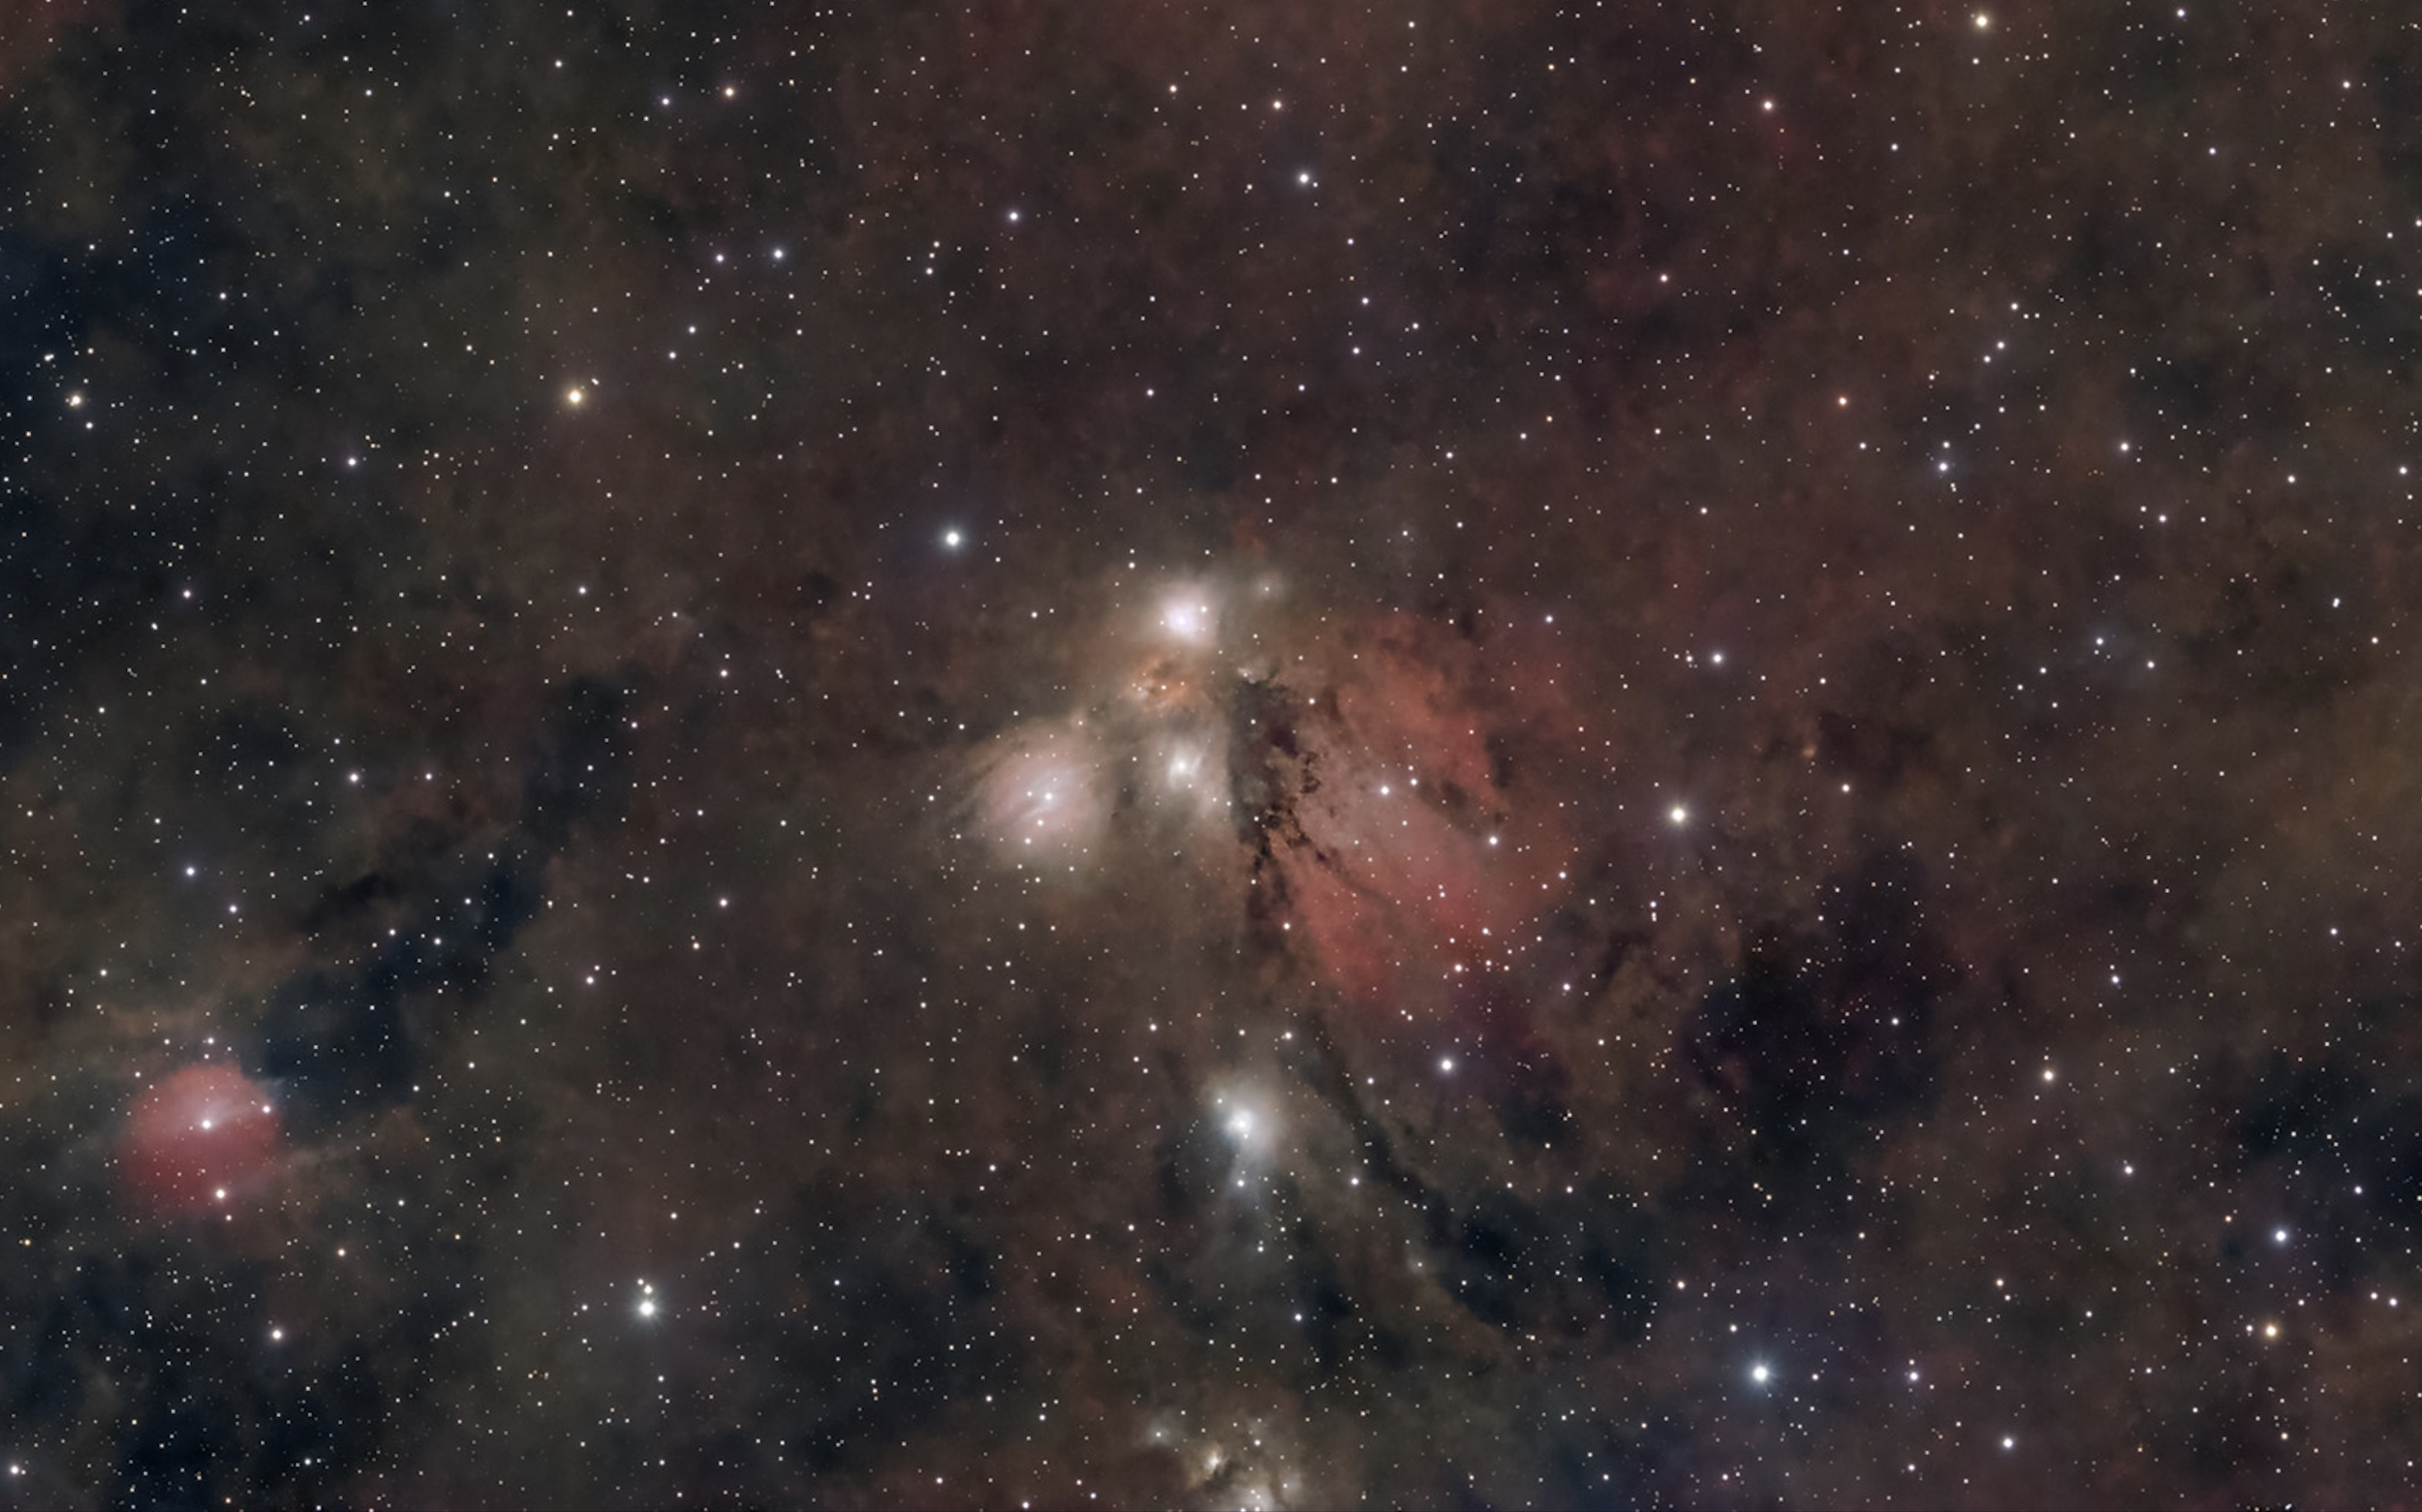
This is how this project was born, which resulted in the image that we proudly exhibit here as Cluster One Observatory.
The observations
Using the ZWO ASIAIR in its “Plan” mode to map Orion
This image of the Orion constellation is the final product of a 9-panel mosaic involving more than 100 hours of observations obtained between December 2023 and February 2024. The observations were made from the Atacama Pathfinder EXperiment - APEX control center in San Pedro de Atacama, Chile. This observing site has grade 2 on the Bortle scale.
For this project, the Rokinon 135mm f/2.0 lens was used coupled to the ZWO ASI294MC Pro sensor and the AM5 mount. Total control of the data acquisition was, as always, in charge of the ZWO ASIAir Mini unit. Finally, the Optolong L-Extreme (narrow band) and OptoLong UVIR Cut (Broadband) filters were used, mounted on a ZWO automatic filter wheel. In the panel that includes the M42 area, an HDR composition was made with exposures of 5, 10, 15, 30, 60, 120 and 300 seconds in both filters, in such a way as to rescue the weak structures without saturating the core.
December 11th, 2023
A night of successful data acquisition is about to end, as Orion sets as seen from the APEX control base, San Pedro de Atacama.
Taken with a GoPro Hero 11 Black camera in night mode
Data processing
Pre-processing
Taking into account the complexity of this project, a series of programs written in Python were developed to maintain the homogeneity of the observations in each panel and filter. The program automatically stores the header of each of the FITS files in a database, with the objective of censusing the frames by panel and filter, suggesting the observation strategy so that all panels and filters have similar integration times, in such a way as to avoid gradients and several other problems that arise when making mosaics of these characteristics.
Post-processing
Once all the data was calibrated, aligned and stacked in Pixinsight’s WeightedBatchPreProcessing (WBPP), PhotometricMosaic was used to merge the master light images into the mosaic itself and for each filter.
As we’re talking about an HaRGB project, both master files were processed identically following a simple workflow:
StarAlignment: As its name suggests, its purpose is to align the broadband and narrowband images for later merging.
Gradient correction: Using GraXpert, both images were corrected using its own Pixinsight integration and its AI algorithm.
Color calibration: Color calibration is the equivalent of adjusting the white balance in deep sky astrophotography. For this, a specialized process called SpectrophotometricColorCalibration (SPCC for short) is used to calculate each star relative brightness and color by comparing them, thus achieving a proper white balance. Note that for this process to work, both images must be plate solved (which is actually the first step)
Deconvolution and optics correction: By using BlurXTerminator, both images can be further enhanced by a process called deconvolution, whose main goal is to recover lost detail due to atmospheric and optics effects.
Star removal: Sounds pretty anticlimatic for a discipline all about stars, but removing stars can be extremely useful for cleaning up unusual artifacts and enhancing faint structures in what we call a “starless” image. This process is valid for both broadband and narrowband, but only the RGB “natural stars” are saved for later stretching and combining with the final HaRGB starless image.
Histogram stretching: Until now, all the data has been worked on using a temporary histogram stretch, as some processes need to be applied in the image’s linear “unstretched” state. From now on though, we can finally bring to life permanently the data that’s been deep hidden in the lowest numbers of the histogram, but for doing so, a careful process is needed.
For this, we use GeneralizedHyperbolicStretch. GHS introduces the ability of customizing the curve which is applied to the histogram, with the goal of transfomring the image from linear to non-linear without the worry of blowing up details while maximixing the sensor’s dynamic range to the maximum. This process is done in iterations, and it’s one of the most delicate parts of the post-processing routine.
HDRMultiscaleTransform: Because of the sheer brightness of the Orion Nebula, it’s core gets blown out quite easily while doing long exposures. We can sort out this issue by taking a series of short exposure images that can be applied later using HDRMultiscaleTransform, a tool that performs wavelet based adjustements to restore the lost details by using these images.
In this particular case, we imported 1, 5, 10, 30, 60 and 120 second images to assure a noise free transition from the affected area to its surroundings. Each short exposure image comprises 30 stacked subframes. Keep in mind that this process is only applied to the recently generated starless images with a luminance mask that only highlights the core.
Once the broadband and narrowband images are done with these steps, the starless versions are saved and imported in Photoshop as 16-bit tiff files. There, they’ll be treated to a series of corrections consisting on repairing artifacts and some minor color and contrast adjustments.
Following that, both images return to Pixinsight to be merged into a HaRGB composition. The process consists on firstly extracting the red channel from the narrowband image (which represents ionized hydrogen) to then, on a specialized script, extract what’s referred as “continuum” from the broadband image. Later on, the continuum and the extracted narrowband data gets merged to subsequently form an HaRGB image.
One of the last crucial steps involves stretching the histogram of the “stars only” images from the RGB image and, by using a simple PixelMath equation, combine the two. The “stars only” image then gets applied as a mask to the combined result so that stars can be reduced and enhanced. Finally, some contrast and color adjustments are done in Photoshop to then export a final .jpeg version for publishing.
Dedication
Cluster One Observatory is a family project, and we wanted to dedicate this work to Santiago Mac-Auliffe Contreras, who on the day of the publication of this image, October 25, 2024, turned 31 years old.
Santiago gave my life the direction and meaning it needed when he was born, illuminating everything around him to this day.
We love you so much dear Santiago… Happy birthday!
Selected regions of interest


Mosaico en Orion
Un proyecto con una larga historia
Motivación
Probablemente desde que tengo uso de memoria y, muy en particular desde que comencé mi viaje observando el cielo, la primera constelación que definitivamente cautivó mi atención fue la mítica figura del gigante Orion quien, seguido de sus dos fieles canes, lucha desafiante contra el Toro y todo lo que se ponga en su mirada. La figura del cazador es delicadamente delineada por las brillantes estrellas que forman la constelación que, a diferencia de la gran mayoría de las figuras en el cielo, realmente resembla a lo que su nombre dice.
Recuerdo haber dibujado Orion mientras lo observaba a simple vista desde la terraza del edificio donde vivía en la ciudad de Santiago de Chile. Todo transcurría cuando tenía 15 años de edad y, mientras más veces la dibujaba, aparecían más detalles e incluso llegué a incluir los principales objetos de cielo profundo, que detectaba usando un set de binoculares. Hasta el día de hoy conservo esos dibujos y cada vez que los veo, una serie de emociones y hermosos recuerdos vienen a mi memoria de aquellas noches cálidas de verano bajo las estrellas de Orion.
Si deseas aprender a identificar una constelación, simplemente dibújala mientras la observas. Luego, puedes sumar recortes para la información adicional. Técnicamente, es una forma primitiva de astrofotografía en sus raíces más puras.
Hice este dibujo en 1986, año del cometa Halley!
Me llama la atención pensar que llegué a formar una relación tan especial y cercana a Orion, que cuando inevitablemente llegaba esa época del año en que el Sol entraba en sus dominios y lo ocultaba bajo su poderoso brillo, contaba las semanas que debía esperar para volver a verlo salir al amanecer.
Hermosos recuerdos que dieron pie a mi pasión de por vida por la observación sistemática del cielo, ya sea a simple vista o con simples instrumentos. De hecho, Orion alimentó la motivación que me llevó a comenzar a soñar con la idea de algún día poder fotografiarlo en vez de simplemente dibujar su forma en el cielo.
Y ese anhelo de fotografiar Orion se materializó finalmente cuando ingresé en calidad de socio a la Asociación Chilena de Astronomía y Astronáutica (ACHAYA) en 1986, año del mítico cometa Halley. En dicha institución tuve por primera vez en mi vida acceso a un observatorio astronómico con instrumentos que me permitieron, entre otras cosas, aprender las técnicas fotográficas análogas tanto en la adquisición de datos como su posterior proceso de revelado. Desde aquella época ya pude capturar la luz de Orion usando inicialmente film de 35mm para luego usar el Astrógrafo NASA, el cual usaba placas fotográficas Kodak.
Mucha historia y observaciones han pasado desde aquel lejano 1986 y mi fascinación por Orion se transformó en un verdadero sustento de mi pasión por la astronomía la cual se mantiene vigente hasta el día de hoy. Y de alguna u otra manera, siempre tuve en mente volver a realizar una imagen de Orion pero utilizando tecnologías actuales tanto en la adquisición como en el procesamiento de los datos.
Utilizando el ZWO ASIAIR Plus en modo “plan” para mapear la constelación de Orion
Las observaciones
Así fue como nació este proyecto que dió como resultado la imagen que aquí presentamos. La imagen de la constelación de Orion es el producto final de un mosaico de 9 paneles que involucró más de 100 horas de observación obtenidas entre Diciembre del 2023 y Febrero del 2024. Las observaciones fueron realizadas desde el centro de control del Atacama Pathfinder EXperiment - APEX, en San Pedro de Atacama, Chile. Este sitio de observación posee el grado 2 en la escala de Bortle.
Para este proyecto, se utilizó el lente Rokinon 135mm f/2.0 ED acoplado al sensor ZWO ASI294MC Pro y una montura ZWO AM5. El control total de la adquisición de datos estuvo como siempre a cargo de la unidad ZWO ASIAIR Mini. Finalmente, se utilizaron filtros Optolong L-eXtreme (narrowband) y Optolong UV/IR Cut (broadband), montados en una rueda de filtros ZWO.
En el panel que incluye la zona de M42 se hizo un HDR con exposiciones de 5, 10, 15, 30, 60, 120 y 300 segundos en ambos filtros, de tal manera de rescatar las estructuras débiles sin saturar el núcleo.
11 de Diciembre 2023
Otra sesión exitosa de captura de datos desde el centro de control de APEX en San Pedro de Atacama.
Fotografía obtenida con una cámaro GoPro Hero 11 Black en modo de imagen nocturna.
Procesamiento de datos
Pre-procesado
Tomando en cuenta la complejidad de este proyecto, una serie de programas escritos en Python fueron escritos para mantener la homogeneidad de las observaciones en cada panel y filtro. El programa básicamente almacena automáticamente en una base de datos el header de cada uno de los FITS, con el objetivo de censar los frames por panel y filtro, sugiriendo la estrategia de observación para que todos los paneles y filtros tengan similares tiempos de integración, de tal manera de evitar los gradientes y varios otros problemas que surgen cuando se hacen mosaicos de estas características.
Post-procesado
Una vez que todos los datos fueron calibrados, alineados y apilados en el módulo WeightedBatchPreProcessing (WBPP) de PixInsight, se utilizó PhotometricMosaic para ensamblar los paneles individuales en un mosaico, esto por ambos filtros.
Como se trata de un proyecto HaRGB, ambos archivos fueron procesados de forma idéntica de acuerdo al siguiente flujo de trabajo:
StarAlignment:
Como su nombre lo indica, su propósito es alinear las imágenes de banda ancha y banda estrecha para su posterior combinación.
Corrección de gradientes:
Usando GraXpert, ambas imágenes fueron corregidas utilizando la integración del programa en PixInsight y su algoritmo de inteligencia artificial.
Calibración de color:
La calibración de color es el equivalente a ajustar el balance de blancos en astrofotografía de cielo profundo. Para esto, se utiliza un proceso llamado SpectrophotometricColorCalibration (SPCC), que calcula el brillo y color relativo de cada estrella comparándolas entre sí, logrando así un balance de blancos adecuado.
Cabe destacar que para que este proceso funcione correctamente, ambas imágenes deben contar con su astronometría en sus FITS header.
Deconvolución y corrección óptica:
Mediante el uso de BlurXTerminator, ambas imágenes pueden mejorarse aún más con un proceso llamado deconvolución, cuyo objetivo principal es recuperar detalles perdidos debido a efectos atmosféricos y ópticos.
Eliminación de estrellas:
Aunque suene algo anticlimático en una disciplina centrada en las estrellas, eliminarlas puede ser extremadamente útil para limpiar artefactos inusuales y resaltar estructuras débiles en lo que se conoce como una imagen sin estrellas (starless). Este proceso es válido tanto para banda ancha como para banda estrecha, pero solo se conservan las “estrellas naturales” del RGB para luego estirarlas y combinarlas con la imagen final HaRGB sin estrellas.
Estiramiento del histograma:
Hasta este punto, todos los datos han sido trabajados usando un estiramiento de histograma temporal, ya que algunos procesos deben aplicarse en el estado lineal no estirado de la imagen.
Sin embargo, a partir de ahora podemos dar vida de forma permanente a los datos que han estado ocultos en los valores más bajos del histograma. Para lograrlo, se necesita un proceso cuidadoso.
Para ello se usa GeneralizedHyperbolicStretch (GHS). GHS permite personalizar la curva que se aplica al histograma, con el objetivo de transformar la imagen de un estado lineal a uno no lineal sin riesgo de quemar detalles y maximizando al máximo el rango dinámico del sensor.
Este proceso se realiza por iteraciones y es una de las partes más delicadas de la rutina de postprocesado
HDRMultiscaleTransform:
Debido al enorme brillo de la Nebulosa de Orión, su núcleo tiende a saturarse fácilmente en exposiciones largas. Este problema se resuelve tomando una serie de imágenes de exposición corta, que luego se aplican mediante HDRMultiscaleTransform, una herramienta que utiliza ajustes basados en wavelets para restaurar los detalles perdidos utilizando estas imágenes.
En este caso particular, se importaron imágenes de 1, 5, 10, 30, 60 y 120 segundos para asegurar una transición sin ruido desde el área afectada hacia sus alrededores.
Cada imagen de exposición corta se compone de 30 subframes apilados. Ten en cuenta que este proceso solo se aplica a las imágenes sin estrellas generadas recientemente, usando una máscara de luminancia que destaca únicamente el núcleo.
Una vez que las imágenes de banda ancha y banda estrecha han pasado por estos pasos, sus versiones sin estrellas se guardan e importan en Photoshop como archivos TIFF de 16 bits. Allí, se les aplican una serie de correcciones que incluyen la reparación de artefactos y pequeños ajustes de color y contraste.
Después, ambas imágenes vuelven a PixInsight para ser combinadas en una composición HaRGB. El proceso consiste, primero, en extraer el canal rojo de la imagen de banda estrecha (que representa el hidrógeno ionizado), y luego, mediante un script especializado, extraer lo que se conoce como el continuo de la imagen de banda ancha. Posteriormente, se combinan el continuo con los datos extraídos de banda estrecha para formar finalmente una imagen HaRGB.
Uno de los últimos pasos cruciales consiste en estirar el histograma de las imágenes solo con estrellas del RGB y, usando una simple ecuación en PixelMath, combinarlas con el resultado previo. Luego, la imagen de “solo estrellas” se aplica como máscara sobre la imagen combinada para reducir y realzar las estrellas. Finalmente, se realizan algunos ajustes de contraste y color en Photoshop antes de exportar la versión final en .jpeg para su publicación.