Observing workflow
An image is worth a thousand words and, when that image is in fact an astrophotography, the final result is the product of a workflow that is applied in an orderly and methodical manner during the observing session.
In “Cluster One Observatory”, we got three well defined observing setups:
Home setup at La Serena, Chile
Dated back from the pandemic lock down times, with plenty of time at home to enjoy, learn, document and making the dream come true.Mobile setup where we travel with our telescopes to dark sites away from the city lights.
This mobile setup compromises several observing sites around La Serena, like Combarbalá, Valle de Elqui, Pichasca and El Pelícano.APEX control base in San Pedro de Atacama
A bortle-2 site perfect for long-term observing projects with an wide field system for large fields. For a full description, check the APEX Ringberg poster.
In this section we will focus on the mobile setup workflow, from the moment we arrive at the observation site and all the steps we take until we start collecting the data.
Finally we will make a brief description of the calibration frames which are of vital importance to obtain quality data.
It’s important to state that a good practice is to arrive to the observing site well ahead Sunset, in order to make use of the daylight for safe setup of the equipments. Also by setting up our equipment early, the optics will have enough time to cool down gradually. Once the optics has reached a thermal balance, will perform better.
In this workflow we will consider the use of the ZWO AsiAir Plus unit (AA+ from now onward), but the concepts presented here are absolutely applicable to any data acquisition system.
Last but not the least, this workflow is what works fine with us and is based just on our experience under the stars. This workflow does not pretend in any way to expose a right way to do things. You are very welcome to contact us for suggestions, corrections or simply to talk about this amazing hobby.
Choosing and setting up the area
Once we have arrived at the observation site, it is time to choose the exact place where we will install our equipment. As an initial basis for a correct installation, we must immediately outline our local horizon, in such a way as to know in which direction the celestial pole is. It is of fundamental importance to have a clear and unobstructed view of the celestial pole to be able to later make our polar alignment. We also suggest installing our equipment on a flat surface and above all, absolutely stable. This rules out the use of any type of terraces or any surface that is unstable. So in brief:
Outline the local horizon using a compass, in order to find out the horizontal cardinal points (north, east, south and west).
Choose a spot with a clear and unobstructed view to the celestial pole
Remember that the elevation of the celestial pole above the horizon is equivalent to the absolute value of the observer’s latitude.Clean the area of any element such as stones or anything that could cause an accident.
Tip: The usage of some heavy duty carpet or equivalent surface is highly recommended.Make sure that the chosen place is flat and stable, avoiding terraces and unstable surfaces.
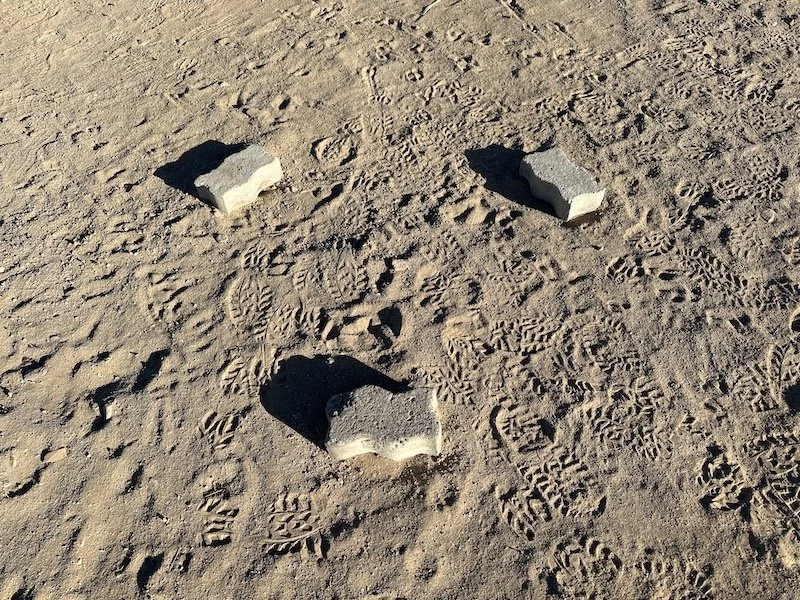
Tip: We use bricks to ensure a flat and stable points to support the tripod legs.
Setting up the mount
Once the place to setup the mount has been selected and well prepared, setup the tripod making sure the index is roughly facing towards the celestial pole cardinal point, by using a compass. Then proceed to level the tripod as accurately as possible using a water level. Once ready and the tripod is leveled and facing the celestial pole, set the mount head and secure it firmly to the tripods head. Once ready, connect the counterweight bar to the mount head and install the counterweights and, if necessary, the third axis counterweight. This operation may vary depending on the type of mount you are using, so we’d suggest to refer to your mount’s handbook for precise instructions and safety when setting up the mount.
Setup the tripod and set the index roughly facing the celestial pole cardinal point using a compass
Level the tripod as accurately as possible using a water level
Tip: Make sure that tripod is well secured and stable by pushing downwards the mounting plate with your hands to ensure is does not move at all.Setup the mount head on the tripod and secure it.
Despite the fact your mount is roughly facing the celestial pole cardinal point, during the polar alignment you’ll have to rotate in azimuth to fine tune its position.
Tip: Make sure that the azimuth control has enough freedom of movement for the azimuth pull-push mechanism
Setting up the telescope
At the “Cluster One observatory” we adhere to simplicity and safety when it comes to the handling and transportation of our equipment. And in the particular case of telescopes, they travel from our house in specially adapted plastic containers to transport them safely. Our philosophy is to minimize the unnecessary manipulation of its critical parts in the field. In this way, everything is previously connected, wired and optimized to be able to mount the telescope in the simplest and safest way possible.
So having said that:
Set up the telescope on the mount, tightening the clamps.
Take out the telescope and guiding scope covers.
Connect and check all of the accessories that you will be using for your imaging session.
Make sure that every single cable is connected and secured.
Tip: Secure cables with cable ties or similar.Get a good idea of where your focus is and move your scope to that spot before balancing.
Move the telescope in every direction and watch out for unsecured cables or just anything that might prevent the telescope to move freely and safely.
Once ready, slew the telescope back to the park position.
Balancing the telescope
Balancing a telescope is an important and key part of astrophotography. Proper balance causes less wear on drive motors and allows the telescope to track more accurately. In our experience, most tracking errors are caused by an improperly balanced telescope.
Start by balancing the declination axis by sliding the optical tube assembly (OTA) until it reaches the balance point.
Then balance in right ascension by moving the counterweights up or down until your mount is sturdy and balanced in any position.
Finally optimize the balance by using the third-axis counterweight.
Leave the telescope in the park/home position (i.e. pointing to the celestial pole)
Check your telescope collimation
In case you’re using reflector telescopes, check the collimation. It’s normal that after a long trip from home to your remote observing site, the collimation gets affected and will produce elongated stars. So take your time to check your optical collimation. This is not needed for refractors.
System startup
Once we have everything fully assembled, connected and balanced, it is time to fire up our system. Usually we do it about 45 minutes prior the start of the astronomical night, in order to cool down the detector and run the initial tests. As we know, we must make good use of the observing time and it can be very frustrating to waste it by troubleshooting, by example, a bad cable or something similar. The sooner we identify the problem the better.
If our power system is portable and battery based, only turn it on when it is really necessary, in order to make good use of it. Also take into account that batteries dry out quicker when exposed to low temperatures. Make sure they are well protected from cold to maximize their operational period.
The next list summarizes our system startup sequence:
Turn on the portable power supply.
Turn on the mount power switch.
Turn on the AA+ and wait few seconds until it boots up.
Connect your tablet to the AA+ WiFi
Start up the AsiAir app
After the welcome screen, click the “Enter Device”
The app gets the date, time, latitude and longitude from the tablet/phone.
Tip: It’s of key importance to ensure this data is ok. Do not proceed any further if the geographical or time data is incorrect or your telescope (with you) will go crazy.Check that the app loads the correct:
Mount
Main/Guide scope FL (Focal length in mm)
Main camera
Guide camera
Other devices like the Electronic Filter Wheel (EFW) and Electronic Auto Focuser (EAF)
Start the detector Peltier cooling system
Usually we set the detector temperature down to -10 C degrees.
Check the detector gain. Refer to your detector documentation to decide the best gain. A good starting point would be the unity gain.
Power up the dew heaters if needed
Take a quick light frame in preview mode, just to check the communications.
Focus the main and guide camera
It’s well known by everyone that focusing an optical system is a crucial step in the observing session. Out of focus frames are basically useless frames and a pure waste of time and resources. So let’s start by taking an initial focus sequence at the home position.
The focus sequence will de-focus the telescope in several steps, taking a quick frame at every focus position, in order to measure at each focus position the star size expressed in Half Flux Ratio (HFR). At the end of the focus sequence, AA+ will set the focuser to the optimal focus point yielding the smallest HFR value.
After the focus sequence, take a quick preview frame and check the star’s sizes. It’s quite important to make sure the optical train is properly focused before attempting a polar alignment.
Check the auto-guider focus
It’s always a good idea to quickly verify that the auto-guider system is well focused. As a first iteration, simply go into the “Guide” tab and start looping to check the live images. The stars should be sharp and well defined. Otherwise consider some time by focusing the auto-guider.
Polar align (PA) the mount
Go into the PA menu, to start with the polar alignment procedure.
The polar align procedure will take a quick frame at the home position to then attempt a plate solve. Then the telescope will rotate 60 degrees in RA to take another frame with the subsequent plate solving. At the end of the process, AA+ is ready to assist you by calculating the polar alignment errors in azimuth and declination.
Click “Let’s Go”Start the loop by checking the “Auto” check box to automatically refresh the measurements.
Now the game is quite straightforward and simple: Adjust the mount azimuth and elevation knobs to minimize the alignment errors, aiming for the smallest possible numbers. Matter of fact, AA+ is so friendly that will give you a “smile” as soon as you’re getting close to the celestial pole.
Tip: The closest you’ll get to the celestial pole the better. Take your time and fine tune the polar alignment.
Slew the telescope back to the Home position.
Auto-Guider calibration
After a successful polar alignment, slew the telescope to your target and start by calibrating the auto-guider.
The workflow involves taking loop exposures of 1-2 seconds to then tap calibrate to start the actual calibration, that will take few minutes depending on the auto-guider settings.
At the end of the calibration, a graph will be shown displaying the RA and Dec corrections.
We should aim for an overall guiding or 1 arc-second or less. The guiding corrections are highly dependent on several factors, some of them coming directly from our mount affected by motor gears, telescope balance, polar alignment among others. In the other hand, the guiding corrections are also related to external factors like atmosphere stability (i.e. seeing) and wind,
Depending on your control system, you might have access to fine tune several parameters like aggression and backlash.
For a definitive guide to auto-guiding and how to control the optimal parameters values, we suggest a visit to the “How to adjust ASIAir guide aggression” page by “East Wind Astrophotography”,
Start the imaging session
From this point ahead, we’re getting basically ready to start with our imaging session. In AA+ there are plenty of options to program observing blocks, either by simply using the preview mode to save each frame individually or creating a sequence using the “Autorun” or “Plan” mode with a list of sources.
A good observing strategy is a must in every sense and definition. This can be worked out well in advance by using the tools mentioned stated in the planning section. Think in the observing strategy as a flight plan, where you’ve got limited time to capture light from the object in your wish list. Some people loves to image many objects per observing session (i.e. Messier Marathon), while others simply wants to go deeper by collecting hours of hours of data in a single object.
What follows is a set of considerations which are quite important to think about when observing:
How many light frames should I collect ?
As an advise, collect as many light frames as possible. As we know, a master light frame is the result of a combination of many individual light frames and, the more data you’ll get the higher signal to noise ratio which translates in less noisy image. Also by acquiring a high amount of light frames, during the pre-processing you can discard the ones showing elongated stars caused by poor guiding. Also some light frames could became useless due to airplanes crossing the field of view or, most commonly, contaminated by artificial satellites.What about the exposure time duration for the light frames ?
There’s no a definitive answer on this, since it depends on the object’s brightness and what do you exactly want to get our of it. We usually go for 300 seconds light frames under dark conditions and with objects that won’t saturate the sensor. We usually start with a test frame and then we carefully examine the histogram to check the distribution of the light over the sensor.
In the other hand, for bright objects like the famous star forming region known as M42, long integration times will saturate the nucleus of the nebula and for the weaker outer structures, going deep in integration time is mandatory. For this type of objects, High Dynamic Ratio (HDR) is used to combine light frames with different integration times.How often should we focus ?
The focus is related to the ambient temperature and affects the size of the stars in your detector. we’d suggest to experiment with your setup. In our case, we set the auto-focus to trigger every once per centigrade degree temperature change. But at the end of the day, the final answer depends on the HFR so, our advise is to keep a constant monitoring of the data and if the HFR seems to be increasing, is time to focus.
Also remember that in case of using different filters in your optical train (i.e. Electronic Filter Wheel), you’ve got to focus at filter change since they are not parfocal.Telescope meridian flips
A meridian flip operation swaps the telescope to the west side of the mount when tracking before the meridian. Meridian flips prevent that your telescope and camera bump into the mount and do major damage to your equipment and is an important safety phase in your observing session. Most of the acquisition software and controllers like AA+, automatically takes care of the meridian flips. Despite the last, we’ strongly suggest to monitor this operation since involves a long slew of the telescope that can produce loose cables to get stuck and destroyed.The higher elevation the better
In order to plan your observations and get the best out of it, prefer to collect data at high elevation, where the signal of the object is less affected by the atmosphere expressed in air masses. So during your observations try to catch your objects as high as possible when possible.
Calibration frames
During the observing session we focus our efforts on acquiring as many light frames as possible and that’s absolutely perfect but far from ideal, if you don’t acquire calibration frames, which are frames you take in particular ways and under particular conditions, for the precise purpose to improve the quality of your light frames. :
Calibration frames includes:
Dark frames
Darks frames are used to record the electronic noise your camera produces during the capture of a particular exposure length. Those frames are basically observed at the same temperature and exposure time of the light frames but with absolute absence of incoming light (i.e. Telescope cover on)Bias frames
Bias frames are used to take care of the readout noise of your sensor, i.e., the electronic noise the sensor produces when reading the value of the pixels. In high-end cameras, this type of noise can be extremely low but is never zero, and collecting bias frames is an easy way to remove the readout noise. The bias frames are acquired like the dark frames with the shortest possible exposure time.Flat frames
Flat frames are used characterize the uneven illumination of your detector, either caused by the vignetting from using a filter or a photographic lens wide open, or dirt and dust specks in your optical train. This pixel-to-pixel sensitivity variation will introduce gradients that needs to be recorded and, that is exactly what a flat frame is about.
Another way to understand a flat frame is like a special light frame but with the light source coming from an evenly lit flat surface (i.e. Flat panel) set on top of the telescope. The same can be achieved using the twilight sky right after Sunset or before Sunrise and they are named “Sky flats”.
The target Analog-to-Digital-Units (ADU) average value for a well exposed flat frame should be around 50% of the detector So if your using a detector with 65535 levels, aim for an average of around 32000 ADU.
Finally your flat frames needs to be observed with the same detector rotation and filters as the light frames. So if you’ve collected light frames with three different filters, then you’ll have obtain individual flat frames for each filter.
Last but not the least, flat frames are dependent on the detector angle position with respect to the optical train. So if you need to rotate your detector, we’d advise to obtain the flat frames before (unless you’ve got an automatic field rotator)Flat dark frames
Basically a flat dark frame is a dark frame with the same integration time of the flat frame, so we can use the dark frame to subtract the dark noise from the flat frame, to get a calibrated flat frame. The dark frame for the flat must be observed at the same temperature of the flat.
Now the question is how many calibration frames are needed ? As many as possible in short but don’t go above practical limits. A reasonable recommended amount is between 30 and 50 flat frames per filter, 50 dark 50 bias frames. The idea is to collect enough data to build up good master calibration frames.
Anyhow, you’ve got to reserve part of your observing session to obtain the calibration frames. If you’re using a dedicated astronomical detector with a Peltier controller to regulate the sensor’s temperature, then you can use a library of calibration frames (darks and bias) obtained prior to the observing session at home and as this way you’ll save a lot of observing time. But the last is not valid for the flat frames that needs to be acquired at the same rotation angle of the detector with the same optical obstruction caused by dust in the optical path.
Shutting down the observing session
Up to this point we’ve finished our observing session and is time to shut down everything and prepare our equipment for our trip back home. We would like to raise your attention about safety due to the fact we might feel very tired at this point. Make sure you’re awake and in good shape not only because you’ll need special concentration and attention to avoid accidents. This is of crucial importance when comes the moment to drive back home. If you do not feel 100% DO NOT DRIVE until you get some sleep. So having said that, we are ready to start powering down our equipment in the reverse way we did it during at the startup of the session.
Slew the telescope to the home position
Cover the main and guide scope
Stop the detector’s cooling
Power off the dew heaters
Shutdown the acquisition system computer (in our case the AA+)
Power off the mount
Power off the portable power supply
Disconnect the USB cable and power cable that goes from the AA+ to the mount
Wrap the cables securely to the OTADisconnect the power cable that goes from the AA+ to the mount
Carefully wrap around the disconnected cables around the OTADetach the telescope from the mount and place it into the transportation box
Detach the counterweights and bar from the mount
Detach the mount and store it in the case
Retract the tripod legs and get it ready for transport
Store the portable power unit
And try to fit everything back into the car … not easy sometimes. “Space engineering” or Tetris skills” are highly recommended at this stage.
Final considerations
There some considerations based on our own experience, either coming from success or fails, that might be of interest for you and can help you to obtain good data while preserving the safety of your equipment:
During the planning phase, make sure you’ve tested everything. As a matter of fact, connectivity and the acquisition of some calibration frames can be perfectly tried out at home. Do not wait until you are under the stars to test you system. Make sure that you’ve installed and tested every firmware and software updates.
Take your time to properly balance your telescope and check the collimation if you are using reflecting telescopes.
Ensure a good cable management in your setup. Hanging or loose cables will deteriorate your guiding and, in the worst case, might lead to equipment damages.
Check your individual frames on regular basis while observing. There’s nothing worse than realizing that your light frames stars are donuts rather than points.
Check and fine tune the guiding as necessary. Sometimes a bit of tweaking of few parameters makes a world of differences.
Make sure you’ve got plenty of free storage space in your acquisition device (SD card, computer, usb stick, etc). Do not run out of storage space !!!!


